Elyssa
Ready to go0extra parts to buy
Already inside4 of 4
Extra parts0
Wires to connect0
Nothing to add. Plug it in and start.
Best atHas the most things already inside.
Moovma presents · Proudly Tunisian
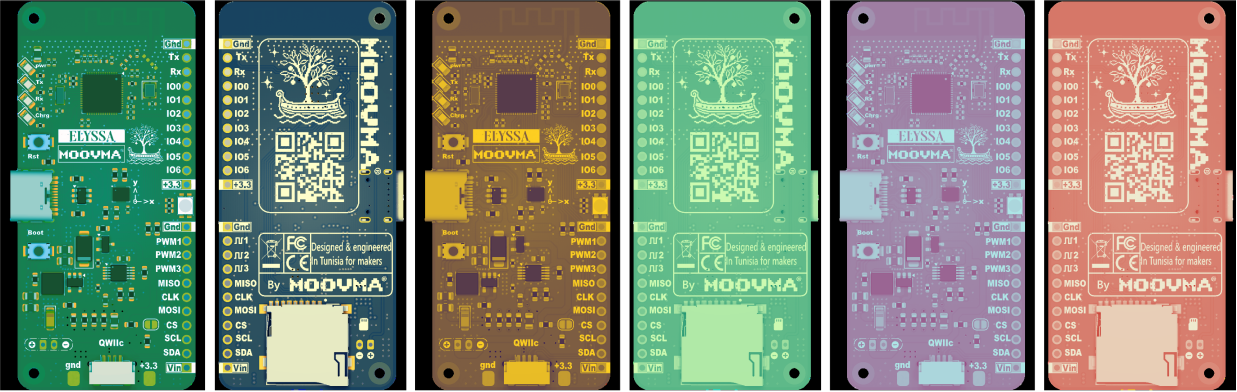
Meet Elyssa. Wi-Fi, Bluetooth, motion sensing and battery charging on one tiny board, designed in Tunisia for the makers, students and engineers who will build what comes next. Plug it in, upload a sketch, and make something real today.
We believe the future of Tunisia is made by people who dare to invent. Elyssa is our first step: the first Tunisian dev board, designed so anyone with curiosity can go from an idea to a working prototype in an afternoon.
Wireless, motion-aware and ready for the Arduino IDE. Everything useful is already on the board, so your attention stays on the thing you’re making.
See the full feature list ↗Pick something to make. We show what each board already has inside, and what you would still have to buy and wire. Fewer extra parts means you start building sooner.
Or pick what it should do:
Elyssa: ready, nothing extra. ESP32-S3-DevKitC-1: 2 extra parts. Arduino Uno R3: 5 extra parts.
Nothing to add. Plug it in and start.
Best atHas the most things already inside.
Best atHas the most pins.
Best atWorks with 5 V parts and has tons of tutorials.
Plenty fast for real projects.
Room for big sketches (no PSRAM).
On-board antenna, no extra module needed.
Plus power, TX, RX and charge lights.
Code, power and Serial Monitor over one cable.
Use a level shifter for 5 V parts.
IO0 to IO6, I2C, SPI, UART and 3 PWM outputs.
IO0 to IO6 keep working with Wi-Fi on.
Specs come from each maker's official documents. Extra parts and wire counts are typical choices, so your project may differ. All three are good boards: pick the one that fits your idea.
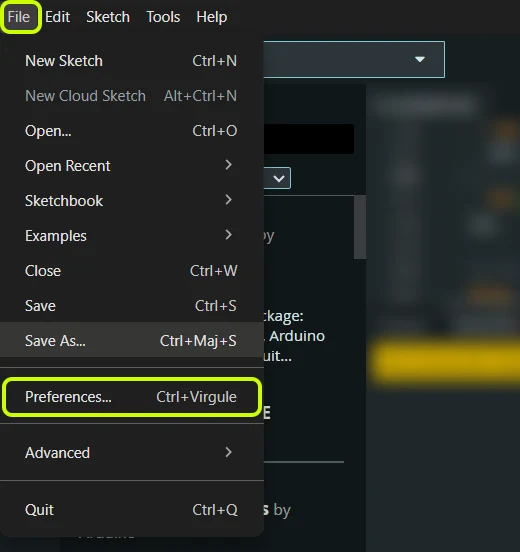
No ESP32 experience needed. Follow the pictures: the green boxes show exactly where to click. Six steps and the on-board LED is yours.
Full guide on GitHub ↗Download and install the latest Arduino IDE 2 for your system. On Linux and macOS you also need Python 3.
Download Arduino IDE ↗In Arduino IDE, click File, then Preferences…
Copy this link and paste it in Additional boards manager URLs (the highlighted box). Then click OK.
https://raw.githubusercontent.com/moovma/Elyssa-dev-board/main/elyssa-arduino/package_moovma_elyssa_index.json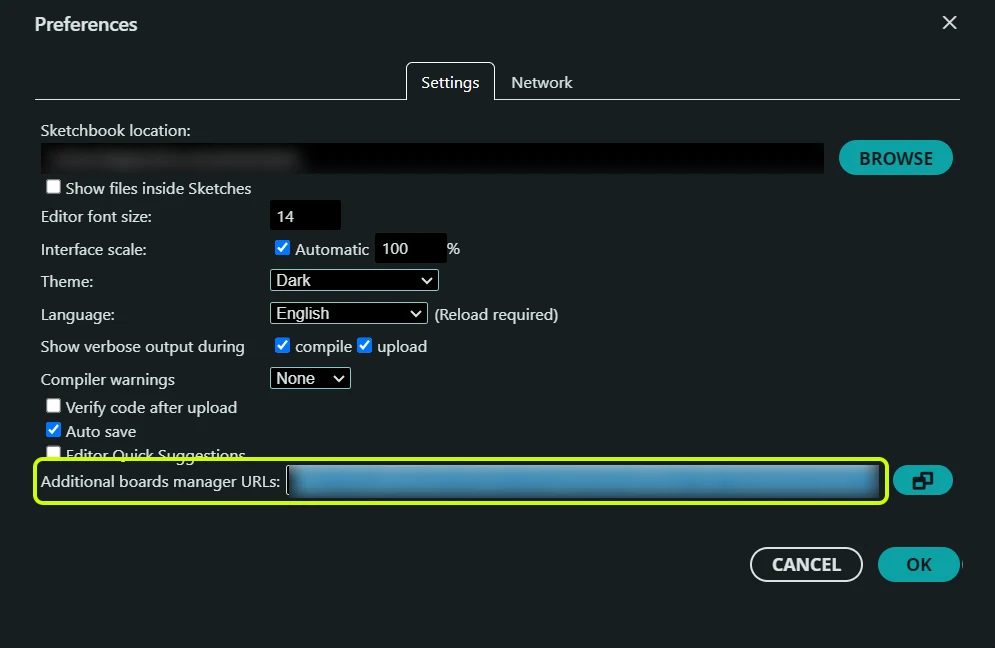
Already have another link in that box? Click the small button at its right and put the Elyssa link on a new line.
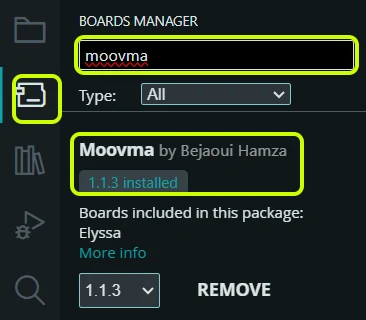
Click the Boards Manager icon on the left, type Moovma and click Install. When it says installed, you are done here.
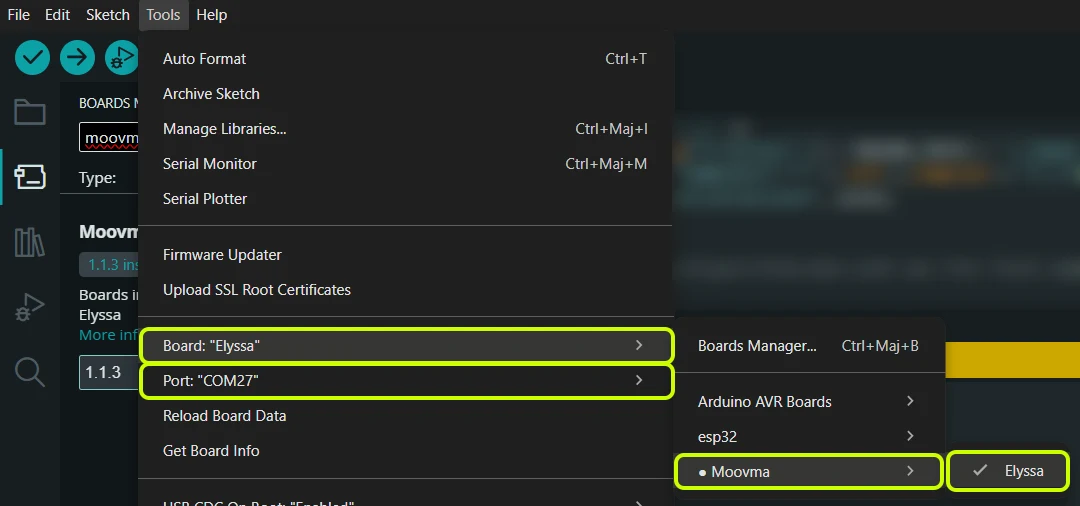
Plug Elyssa in with a USB-C data cable. Open Tools → Board → Moovma → Elyssa, then Tools → Port and pick the Elyssa port. Leave the other Tools options as they are.
Open File → Examples → 01.Basics → Blink. Check that Elyssa is shown at the top, then click the Upload arrow. The on-board LED starts blinking: your first program is running on the first Tunisian dev board.

Hold BOOT, press and release RESET, then release BOOT. Select the port that appears and upload again. This is usually only needed once.
Something else on your mind? Email us.
No. If you can use Arduino, you can use Elyssa. The quick start above takes you from the box to a blinking LED in four steps, and if you get stuck you can email us.
The free Arduino IDE 2 with the Moovma board package. The basics, like the RGB LED and the motion sensor, are built in, so you do not need extra libraries to get started.
Yes. The code, the board package and the documentation are public on GitHub under the MIT license, and you can download the schematic for free.
Fill in the short form and choose how many boards you want. You pay nothing now: we contact you before any charge to confirm your order.
You will see the official price as soon as you reserve your board. Nothing is charged until we have spoken to you.